


Welcome to the Blog
Explore Blog Posts that showcase our work, our values, and our team

As millennials living in a selfie-obsessed, narcissistic world, we can’t help but wonder how those Instagram models achieve their flawless look. Or how celebrities always manage to have perfect, glowing skin. Is it airbrush makeup? Is it traditional makeup? Both methods are commonly used but what makes them different?
Airbrush Makeup:

Airbrush makeup is a light-weight makeup that is applied through an air gun. It is designed to deliver a thin layer of makeup through a consistent, fine mist. How is this done? A thin, airbrush-intended foundation is put into the airbrush gun chamber. This foundation solution can consist of one or many colors. Pulling the trigger will release a light mist of makeup from the gun. The gun is moved in circular or sweeping motions along the face to slowly build a perfect complexion.
Traditional Makeup:
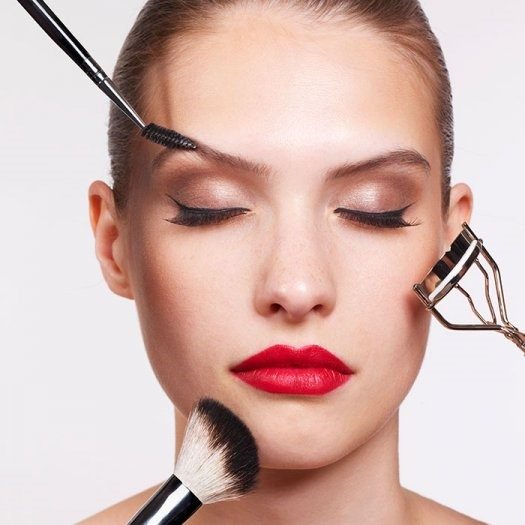
Traditional makeup comes in a cream, liquid, or powder form that is applied by fingers, sponges or brushes. This form of makeup is the most accessible and comes in the widest variety of pigments and brands. It is extremely versatile and can range from very sheer to very intense coverage. How is this used? This form of makeup can be used in any situation at any given time without restrictions.
Pros of Airbrush Makeup:
Airbrush makeup is amazing because you can custom blend your foundations to create a person’s exact skin tone. The drops of foundation that are placed in the chamber can be completely customized to each individual. For example, you may choose four drops of “sand” and two drops of “beige” to achieve the exact tone you desire. Another benefit of airbrush makeup is that it is a much finer product than traditional foundation. The pixilated spray from the airbrush gun actually mimics the way a camera would capture your face. Airbrush is also, in many cases, waterproof. This is especially advantageous if you sweat heavily or know you will be emotional. This also prevents transfer of makeup onto your clothing, which is always a plus.
Pros of Traditional Makeup:
Traditional foundation is great because it has very rich coverage. You are able to better blend the product into your skin, which is great for skin types with texture issues. This is quite difficult to achieve with a machine. Using traditional methods also allows you to be more detailed, relying on the skill of the artist instead of a machine. Coverage is also more flexible. This is important because you can actually manipulate the viscosity of the makeup through a hands-on technique. Another plus is many brands are now offering formulas that are silicone based. This allows the makeup to be water resistant while giving you more resilience against wear.
Cons of Airbrush Makeup:
Airbrush makeup is known for its clean, skin perfecting finish. However, like most things, it has its cons as well. For those with vellus hair, airbrush can leave an unwanted finish. Traditional makeup adheres to pores whereas airbrush adheres to smooth, moisturized skin. Skin with hair can leave someone looking like a fuzzy peach. Airbrush is also not ideal for those with acne, scarring, wrinkles, dry skin or fine lines. Airbrush delivers an even flow of product and, in these cases, traditional foundation would be more suitable. The downfall is that it really only works on skin that is in pretty good shape, and it should never be applied heavily.
Cons of Traditional Makeup:
Traditional makeup requires a good makeup artist to achieve satisfactory results. The consistency of foundation is usually much thicker and this can lead to a cakey look. Also, traditional makeup is not always waterproof, which can lead to a lack of durability or transference to clothing. Often, SPF is an ingredient in this type of makeup and can cause your face to look white or ghostly in pictures.
Each type of makeup has its pros and cons. The key is to make your decision based upon which makeup is best for YOUR skin type. Consulting a professional is your best option. Every person will have their own preferences, but this knowledge should aid you in making the best decision for your makeup needs!
read full post >
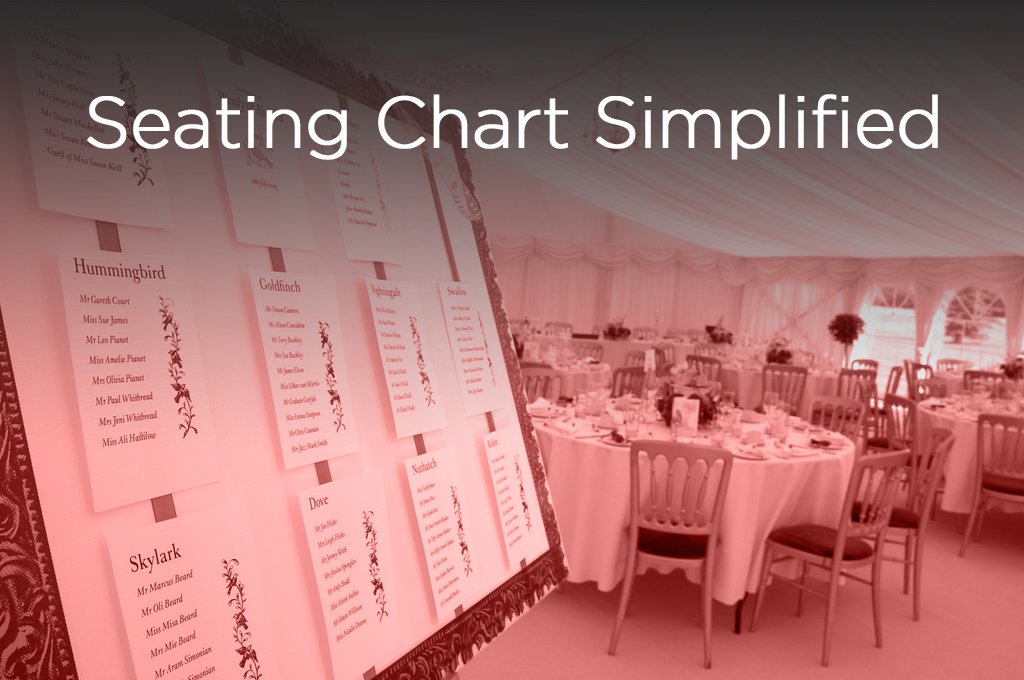
I truly enjoy writing these Lady Luxe Blogs because a majority of them stem from firsthand experiences. Being a bride to be has allowed me to figure out the “how tos” of the wedding process and then simplify and share with you. As a bride, your nuptials are often your first debut in the wedding world. Everything seems overwhelming and new because it is! Just as you are nearing the final month of the planning process, you will find that you have to conquer yet another task that you know little to nothing about. The seating chart! For some of you, this may come easy, whereas others may be mystified. As someone who was more unsure than not, I will gladly break it down for you!
First, how many people are attending your wedding? For the sake of explanation, I am going to pretend you have 120 people coming. With 120 in attendance you will want to decide how many people will be seated at each table. Before you simply throw a number out there, examine your reception space. Based on the square footage of your venue, you may opt for more or less table—depending upon square footage. For example, if your reception room is approximately 5,000 square feet with 120 people, you may opt for tables of 8 to 10. This will allow the room to look full but not overcrowded.
Another important tidbit to keep in mind is that the more tables you have, the more floral arrangements you will need. It is important to make sure you are staying within your budget. The layout is yet another important factor to consider. Is there a giant statue in the middle of the room? Or, is the room an open layout? Factors such as these may change how many tables you want. Your final table number count should derive from your layout, square footage, and budget.
Once you have decided on the amount of guests at each table, you will ultimately want to decide the optimal seating arrangement. I found this task to be rather daunting at first and decided to start with our family. I Googled “best ways to seat family,” only to really find that the traditional method is to either to do a head table or to seat the parents, grandparents, and officiant together. In our case, our grandparents will not be in attendance and we do not have a close relationship with our officiant. So, I decided to write down both of our immediate families and see how we could best seat everyone. We decided early on that we would do tables of 10. Due to my fiancé’s family being larger, we were unable to fit immediate family all at one table. We decided instead to seat all of our brothers, sisters and significant others at one table, our aunts and uncles at another table, and our parents, god- parents and closest friends at their own table. There is no science in deciding how family should be seated; it is strictly preference and what works best.
Next, “Where do I seat the rest of my guests?” Rather than becoming overwhelmed by this task, do yourself a favor and start jotting down the names of people and friends you know would like to sit together. Simplify things by putting each set of parents in charge of grouping their guests as you take care of yours. Do your best to make as much sense as you can in grouping, but understand this will never be perfect. We’ve all attended one wedding or another where we haven’t known who we are sitting next to and guess what? That’s perfectly fine! Do your best to sit guests next to friends and family and to those whom you think they may get along with best.
Ok, so now you have your groups of people together but can’t decide exactly where they should be placed throughout the room. As rule of thumb, bridesmaids, groomsmen and family are typically closest to the bride and groom. Unless you are doing a head table, you will want to place them in the tables nearest you. If you have elderly guests attending, try to avoid seating them right next to the band or DJ. Also, seat guests in a way that will promote dancing. Lets face it, some people will be the life of the party and others not so much. Sit guests in a way that will encourage them to let loose and have fun!
I hope this helps you in your seating chart process. Understand this is an art, not a science! Consult friends and family who have also had to plan seating and ask them for their help. Best of luck!
read full post >

I am getting married in 44 days! As a bride to be, I know firsthand how difficult it can be to plan a wedding. It’s single-handedly one of the most emotionally and mentally draining tasks I have been faced with. Balancing work, relationships, and a wedding is not easy. The amount of minutia that goes into each decision is nothing short of overwhelming.
While I am finally in the home stretch, I can’t help but wonder, “What am I forgetting to do?” I’ve compiled a list of helpful tips and suggestions to make sure you don’t miss a thing!
- Make it legal. Yup, that’s right. As nice as it would be to stroll into your ceremony venue and simply say I do, it’s just not possible. You need the proper documentation. Often times marriage licenses are only good for a short window of time so be sure to obtain the license in the state you are getting married in an ample time frame.
- Organize your belongings. Whether your wedding is local or destination it is smart to create a checklist ahead of time outlining everything you will need. Giving yourself a few months is ideal as you are less likely to forget anything. Before the big day, make sure everything is organized and easy to find. This will save you a lot of stress on the big day.
- Check in with vendors. With all the back and forth you have endured during your engagement process there is bound to be some loose ends to tie up. Speak with each vendor and confirm your final payments and make sure they have everything they need.
- Tips! You do not want to forget to tip your vendors. They too have put a lot of time and energy into your wedding and should be rewarded. Do your research and figure out the proper amount to tip each vendor.
- Check in with your bridesmaids. Throughout this process you will have done a lot of delegating and often fail to remember the simple tasks like ensuring the bridesmaids are informed. Make sure the bridesmaids understand the timeline for the weekend as well as any additional details they may need to know.
- Pack an emergency kit. Let’s face it. Something is bound to go array whether its big or small so be prepared. Creating a kit with items such as bobby pins, tide pen, hairspray, sewing kit, etc. will ensure you are ready to handle anything that may be thrown your way.
- Schedule your beauty appointments. Appointments such as nails, hair, skin, etc. should all be coordinated properly. You don’t want to have a facial too close to your wedding day and you also don’t want to schedule your nail appointment too soon.
- Welcome bags. If you are having a wedding out of town it is especially nice to treat your guests. These bags normally contain information on the area as well as treats and fun gifts. Give yourself ample time to make these bags and figure out a delivery plan.
- Playlist for getting ready. Before you walk down the isle you are going to feel anxious and overly excited. Having good music while you’re getting ready can really set the tone. Create a fun playlist and make sure you bring your speakers.
- Break in your shoes. If you are planning to wear heels it is smart to wear them around the house. Breaking your heels in will allow them to be more comfortable at the wedding. More dancing please!
- Pack for your honeymoon! If you are leaving right after your wedding you will want to make sure you have everything packed for your honeymoon. It is smart to also create a list of everything you will need to ensure nothing is forgotten.
I hope you find these tips and tricks helpful in the last few weeks of your wedding planning. It is always helpful to be prepared and organized. Just remember, planning a wedding is stressful, but it will all be so worth it in the end!
read full post >
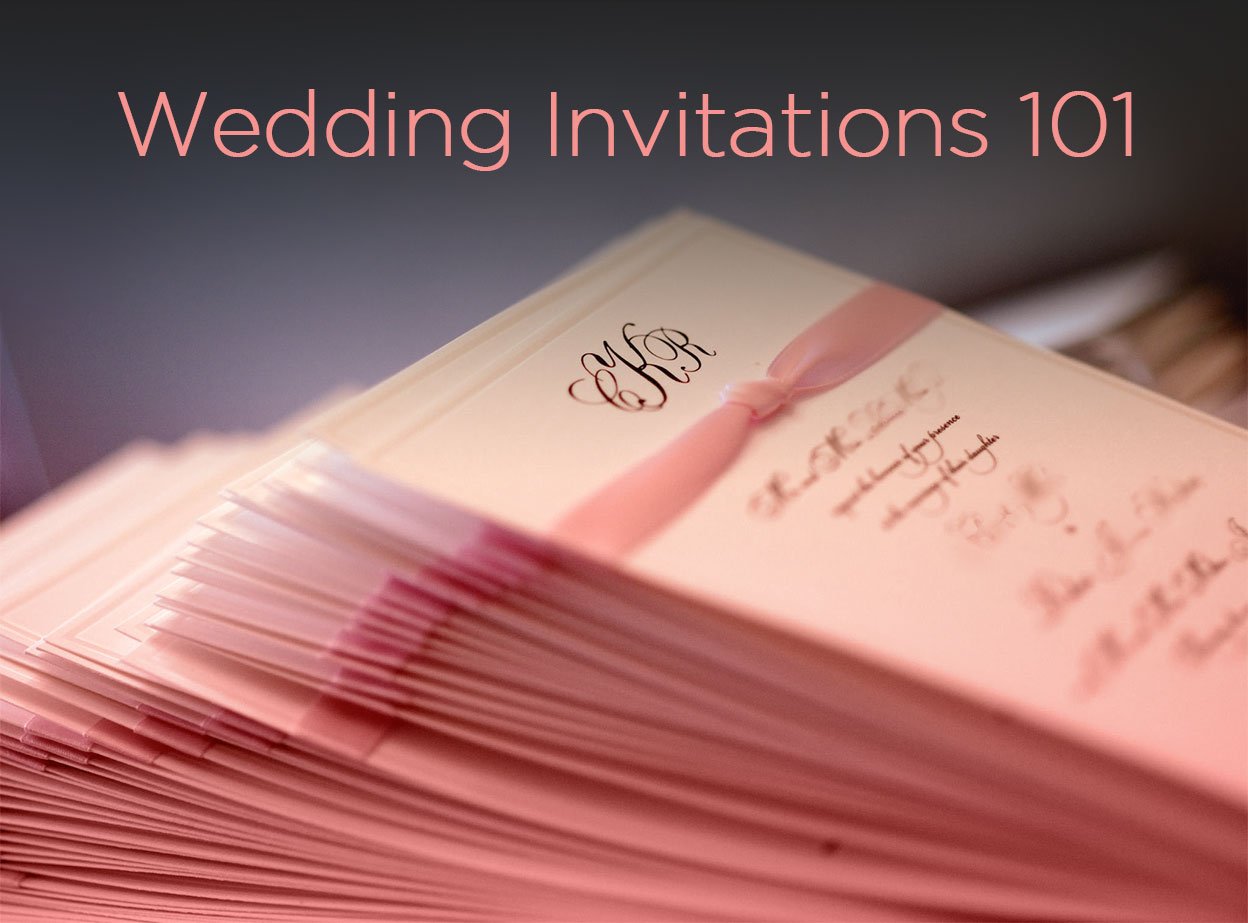
The wedding invitation is the first thing your guests will receive. The invitation dictates more than you may realize. Not only does it share factual information such as when and where, but it also conveys the look and feel of the day. This is portrayed through the aesthetics of the invitation: color, fonts, style, etc. With first impressions being everything, it is important to send an invitation that truly represents your wedding. Fortunately, there are many ways of obtaining and designing wedding invitations. Perhaps you are hands-on and want to go to a store; maybe you prefer to order online and keep things easy; or perhaps you’re a DIY kind of girl and wish to print or craft from home. All of these methods have their advantages and disadvantages and I’m here to break it down for you!
In Store Invitation
Living in an internet-consumed world, we often avoid going into stores to shop. However, physically going in and choosing your invitation has its perks. An appointment is set up for you to sit down with a professional to go over styles, content, and pricing. In store you are able to go through examples and actually feel the cardstock and see the invitation in person rather than guessing from behind a computer screen. The invitation specialists will help you choose the proper wording and give you expert advice. They will provide you with a proof and ensure your invitation is perfect. While this process is often more trouble-free and aesthetically pleasing, it can be quite expensive. Invitations made this way can cost you upwards of $900 without postage. The in-store option allows your invitations to be professional seamless; however this comes at a high price.
Online Invitation
It is safe to say that wedding invitations from stores such as Paper Source are truly elegant, however, some of us do not have the time or the budget. There are many websites such as “Wedding Paper Divas” and “Minted” that allow you to peruse and personalize hundreds of different types of invitations. This method can be very beneficial for those with less time because you can easily search by style, color, etc. Lets not forget about sales! Online invitation companies often run promos, which can help seriously cut down costs. Another perk is that you can easily be linked to matching stationary that you will eventually need such as table numbers, thank you cards, etc. Bottom line, ordering online allows you to choose from home with ease. While this sounds amazing, it is important to know it comes with some disadvantages as well. Unfortunately, you will not be able to physically see or feel the invite in person, nor will you have the professional guidance that you would in-store.
Digital / Paperless Invitation
With today’s amazing technology it is no wonder we are now able to send wedding invites digitally. This is a huge cost cutter as we completely cut out then need for supplies. Companies such as “Green Envelope” and “Paperless Post” are encouraging you to save money, time, and even the environment. This method still allows you to choose a design as well as colors and wording—just without a physical copy. The advantages are that you will save a lot of time and money; however this method may still be too modern for some of our elders. Weddings are meant to bring family and friends together and, while some of us are tech savvy, others are not and we would never want an invitation to not be received.
DIY Invitation
The DIY invitation is not the most common choice, however, if done correctly, it can really portray your style and wedding theme as a couple. There are many different ways of going about a DIY invitation. You may used mixed media or even handwrite! Doing it yourself allows the invitation to be exactly as you would like it. There are, unfortunately, more disadvantages than advantages in this scenario. ‘Doing it yourself’ can be very time consuming. Whether you are printing, cutting, painting, etc., it all takes a great deal of time and effort. You are also more likely to leave room for error. As much as we like to give ourselves credit, we are not robots, and this can result in costly slip-ups. Fortunately, there is another way of “DIY” that prevents many errors and saves a lot of time. Printing from home! Craft and paper stores often times sell blank invitations. What is neat about these is that you bring them home, log onto a website, choose a template and wording, and print! This spares you the expensive printing costs and saves the time of getting super crafty. The downfall to this method is the lack of expert advice, but fortunately it has more pros than cons.
There are MANY different avenues that you can choose from when preparing wedding invitations. The beauty is that certain routes are more advantageous to some than others. Determine a vision, set a budget, and establish a timeline. Once you have that completed, you will know which invitation method best suits you.
read full post >
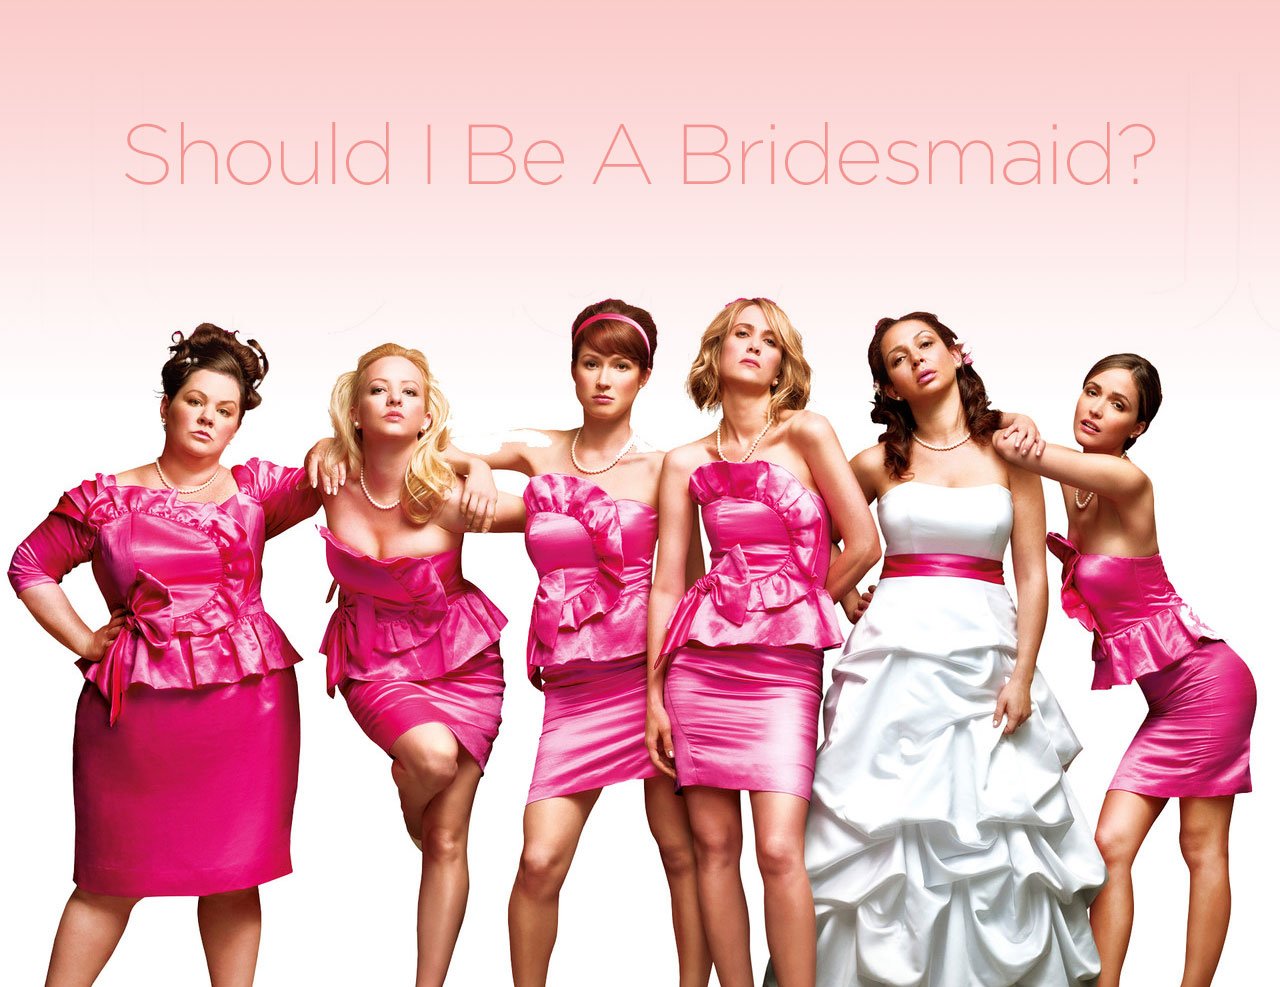
Many girls may view this as a rhetorical question. However, there are two possible answers. Yes or no. Despite the apparent ease in answering this question, we must truly examine what is being asked of us. Since the beginning of time brides have been asking friends and relatives to stand by them on their special day. Having a bride ask you to be a part of their wedding party is truly an honor. With that being said, do you know what you are signing up for? The responsibility of a bridesmaid can be high in cost, time, and emotion.
Let’s talk costs. The first expenditure we commonly associate with becoming a bridesmaid is the bridesmaid’s dress. The average cost of a bridesmaid’s dress is $150 prior to alterations. It is possible that the bride may purchase the dress, but that is not customary. Along with the dress also comes the responsibility of jewelry and shoes. Some brides are lax when it comes to accessories, and others not so much. It is important to factor in that this may be an additional cost, ranging from $50 to $150+. Lets also not forget hair and makeup. Depending on the location of the wedding, hair and makeup can cost anywhere from $100 to $300. Once again, some bridesmaids may expect this while others may not.
What’s a wedding without a bachelorette party? While this may be one of your favorite parts of the experience, it may come with a high price tag. Bachelorette parties consist of an array of different options. The bride may propose a local dinner, a local weekend getaway, or a destination getaway. Be prepared financially. As a friend or relative of the bride, be open and honest about finances if you are concerned about costs. Not everyone can afford the costs of a bachelorette party but its up to you to decide whether to squirrel away funds or to respectfully bow out. Fortunately, attending the bachelorette party isn’t mandatory, but it is a grand gesture.
The bridal shower is an extremely important component of the wedding process. Typically, the bridesmaids, the bride or groom’s mother, or a family relative hosts the shower. This is a cost you will want to potentially account for. Expenses such as venue, meals/catering, décor, gifts, etc should be considered. The average cost of a bridal shower at someone’s home or a mid-range priced restaurant is anywhere from $15 to $40 a person. A more elaborate shower can cost anywhere from $40 to $150+. On top of these expenses you will want to factor in the cost of your shower gift.
Lastly, accommodation and gift costs. Depending on where the wedding is taking place, you may need overnight lodging. A hotel may cost you anywhere from $75 to $300+ a night. If you are attending a destination wedding you will want to do your homework and account for whether you will need a rental car, hotel, and flight. A gift is also a necessity when attending a wedding. As a bridesmaid and close friend, the average spent on a wedding gift is $75 to $150+.
At the end of the day, being a bridesmaid is far from inexpensive! Not only do you need to account for the expenses I have mentioned above, but also the time you will spend planning and emotionally being there for your dear friend/relative. It is only fair to plan and put proper thought into whether you are able to fulfill the duties of a bridesmaid. There is nothing worse than being ill prepared and eventually upsetting the future bride as well as yourself. No matter your decision, if handled properly, your bride-to-be will understand and appreciate you wanting the best for her. We are all human, and at then end of the day all we can do is our best.
read full post >
Ah, the great debate! For all the type A people out there, I’m sure you can appreciate this question. This really hits home for me because, boy, was it a pending concern during my wedding planning process! Now you may think, “who cares”? If you’re saying that to yourself, you can probably spare yourself by not reading this blog entry. However, if you are someone who has extreme attention to detail, you will appreciate my story and the advice I have to offer.
I was cutting one of my client’s hair, explaining to her my planning process thus far, when we began talking about my wedding gown. She asked me, “Are you doing ivory or white for the mens’ shirts?” I quickly replied: “Wait, what?” I have already over-analyzed every detail of my wedding at this point and now this is being brought to my attention? She explained that she used to work for a Men’s Warehouse and, with her dress being ivory, opted for ivory shirts for her groomsmen. Ok, simple enough; I’ll tell the guys to get ivory shirts. WRONG! It was going to entail a lot more than that.
I accompanied my fiancé to his initial alteration appointment at a custom suit store. I spoke with the salesmen there and told them the advice my client had given me and they said, “Oh not a problem, when the groomsmen rent their tuxedos have them get the lightest ivory shirt they carry.” Unfortunately, this was horrible advice. Unbeknownst to me, there are a million different shades of ivory ranging from dark to light and all consisting of various undertones! The likelihood that there wouldn’t be 50 shades of ivory is slim. So, I began researching online, only to find a number of articles stating whether or not they cared about white vs. ivory. I couldn’t find any information as to where or how I would obtain shirts to perfectly compliment my gown.
One night I was perusing the internet and found a photo of Ryan Gosling in an ivory tuxedo jacket. Not only was I pleased to come across Ryan Gosling, but equally pleased to see a man in an ivory jacket. My fiancé had told me that his grandfather had done this look as well; Ivory tuxedo jacket with black tuxedo pants. Could this solve the entire issue? My fiancé was excited that his initial desire to sport this look was now possible.
However, just when I discovered how hard it was to find ivory shirts, I soon learned that finding an ivory jacket is an even more difficult feat! Shortly thereafter, I learned that the only way to get an ivory shirt—especially tone specific—is to go the custom route. This can be extremely difficult financially for some of the members of your wedding party. If you have groomsmen from out of state this can also become especially challenging, as they are not only spending money traveling to and from your wedding, but also spending time to get measured and return that information to you. At this point, we were pleased that we only needed to find an ivory jacket.
My fiancé and I tried our luck at a few spots along Newbury St. only to find that there were either very few ivory options or that they really couldn’t customize the jacket at all. Despite our bad luck thus far, the third time really was a charm. We were able to find a fabulous place called “9tailors.” They had a plethora of ivory options, whether they be shirts or jackets. We had 7-8 different swatches to choose from for the jacket and were able to match it perfectly to my dress. There wasn’t a customizable feature that they didn’t offer. Finally! One more wedding detail checked off the list. Fellow brides know how nice it is to check tasks off the list.
Now, whether ivory or white shirts and jackets really matter is completely subjective. Just know that the only way to truly match your groom is to go the custom route. Is this headache worthwhile? For me it was, and now I’m confident we will look amazing on our big day.
“The difference between something good and something great is attention to detail.
Charles R. Swindoll”
read full post >


Bridal + Entourage Hairstyling


